
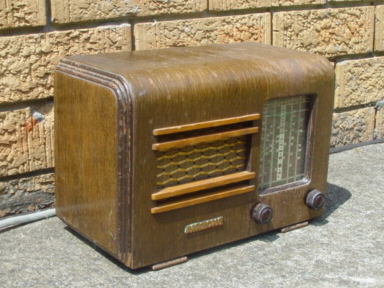
Restoring a 1950 Airzone Cub midget - Part Two
After some pondering and measurements it has been decided that this set meets alignment specifications. For now I will dispense with the planned tune-up of this set as the sound coming from the 4 inch speaker is quite loud, even without an aerial and the dial pointer is calibrated quite well on the scale. Things have obviously not been fiddled with by someone thinking that the screws were loose.
I will now describe some of the tricks I had to perform to get this fairly shabby-looking set looking like new again though just before going ahead with that I will explain something about restoring radios and it relates to how and when this should take place. I plan on writing a dedicated article about this at some stage though for now, this set was not working when I got it, due to faulty condensers and a perished power cord. At the same time the lacquer had degenerated to the point where it was getting all over whatever I sat the receiver on.
There are some collectors that have a hardline approach to restoration - ie: It should never take place. A set should be acquired and stored as found, no matter what. I disagree with this for several reasons, just the same as I disagree with the notion that everything that is found should be restored to factory standards. I fall into the middle here somewhere and I believe that most collectors do - restore if needed, otherwise tidy up a set, give it a bit of spit and a rub then that's it.
With a decision made to restore the cabinet I pondered on several things. I am not a carpenter/joiner, so do I have sufficient experience? Is the set too old or too historically important to be restored by someone with my skill level - should it be restored by a carpenter and french polisher instead?
Most commercially made receivers were never French polished, per se. A few coats of shellac doesn't always pertain to whether the set was French polished or not. It comes to how shellac is applied, among other things and that is why a French polisher is a skilled trade in its own right. French polishing is also extremely expensive and the technique would have provided the mother of all bottle-necks on any production line.
In the case of the Airzone, I planned to strip back the remaining lacquer, sand back the veneer sufficiently so that any old traces of lacquer would not be present once the cabinet was repolished (known by some as toffee-apple effect) then painting the trimmings with a very dark brown gloss enamel paint, then applying shellac to the veneer. After this there was a view to applying a couple of coats of nitro-cellulose lacquer to the whole cabinet, however I am still unable to source any, despite being told a few years back that it is still made.
Sanding back
The biggest mistake that can be made with a wooden radio cabinet is using power tools to get the job done quicker. I got a blister on my thumb from the manual sanding that this cabinet required, though the small amount of pain involved was easier to put up with than looking at the damage caused by a belt sander, electric file or similar implements. Don't be tempted to use these things - it will lead to disaster. You have been warned.
The main reason for the above warning is because the veneer on an old radio is seldom more than half a millimetre thick, one millimetre at the most and usually only on the bigger sets. Power tools can and will chew straight through it, licketty split, and there is no point of return from here on. The other thing is that all the veneers I have come across are made of fairly soft woods. You have it all against you if you want to be impatient.
I sanded this set back fairly easily as the lacquer was in quite a degenerated state. Most if it simply flaked off. I used sanding gauze for most of this as it is quite durable but not as harsh as emery cloth and it doesn't leave as much mess as traditional Garnet sand paper. For getting a very smooth finish, I used a fine grade of 'wet and dry' paper.
Once the sanding is done it was time to fix a small area of the veneer that had started peeling off the set. This was in a quite inconvenient position but the job still had to be done, especially since it was on the front of the cabinet. Leaving it unrepaired would have provided a rather out of place and annoying focal point. After digging out any dirt and loose wood grain I applied some wood glue to the area and held the veneer down with a clamp. This is shown in accompanying pictures.
After this repair the cabinet was inspected for any further deterioration and then washed thoroughly, making sure that there wasn't too much water put on the cabinet. This is because the glues that were originally used on these cabinets, along with the Aquadhere I used, are water-soluble, meaning that they soften when immersed in water. The cabinet was padded with a towel and then left to dry for 24 hours.
Sign In
Vintage Radio and Television is proudly brought to you by an era where things were built with pride and made to last.
DISCLAIMER: Valve radios and televisions contain voltages that can deliver lethal shocks. You should not attempt to work on a valve radio or other electrical appliances unless you know exactly what you are doing and have gained some experience with electronics and working around high voltages. The owner, administrators and staff of Vintage Radio & Television will accept no liability for any damage, injury or loss of life that comes as a result of your use or mis-use of information on this website. Please read our Safety Warning before using this website.
WARNING: Under no circumstances should you ever apply power to a vintage radio, television or other electrical appliance you have acquired without first having it checked and serviced by an experienced person. Also, at no time should any appliance be connected to an electricity supply if the power cord is damaged. If in doubt, do not apply power.
Shintara - Keepin' It Real · VileSilencer - Maintain The Rage