Cabinet Repairs Forum home - Go back to Cabinet Repairs
|
Television and Radio Cabinet Restoration part 1
|
|
|
|
|

|
Location: Albury, NSW
Member since 1 May 2016
Member #: 1919
Postcount: 2048
|
Well here's our project we're going to Restore together !
IT'S A 1957 PHILIPS TV CABINET..
Here's Lucy use to live in this box and so did Homicide and Division 4,,, Not too mention all the carrying on at number 96 and the box!! Oh,, The Culture !😕
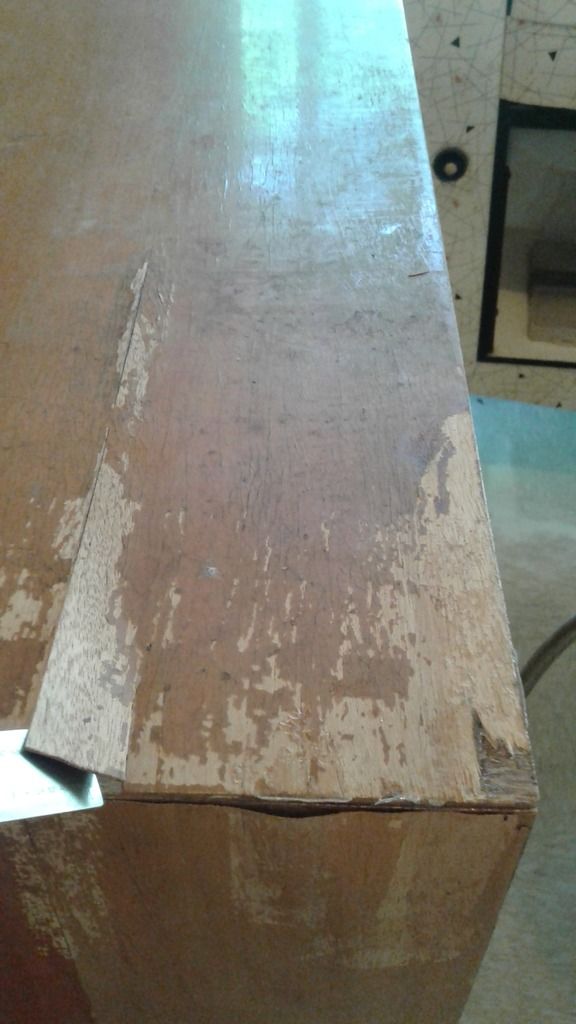
I picked this cabinet because It's pretty good and not too big so the posts wont drag on for too long. It has all the normal things wrong with it that you would find when Restoring a Radio or TV veneer Cabinet.
It has
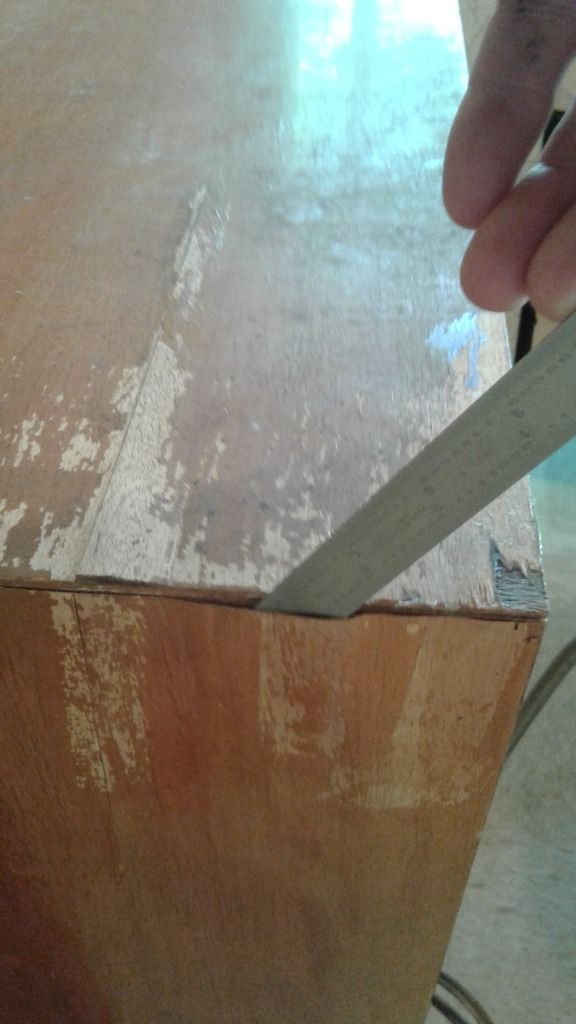
: split veneer and falling off in places
: missing veneer.
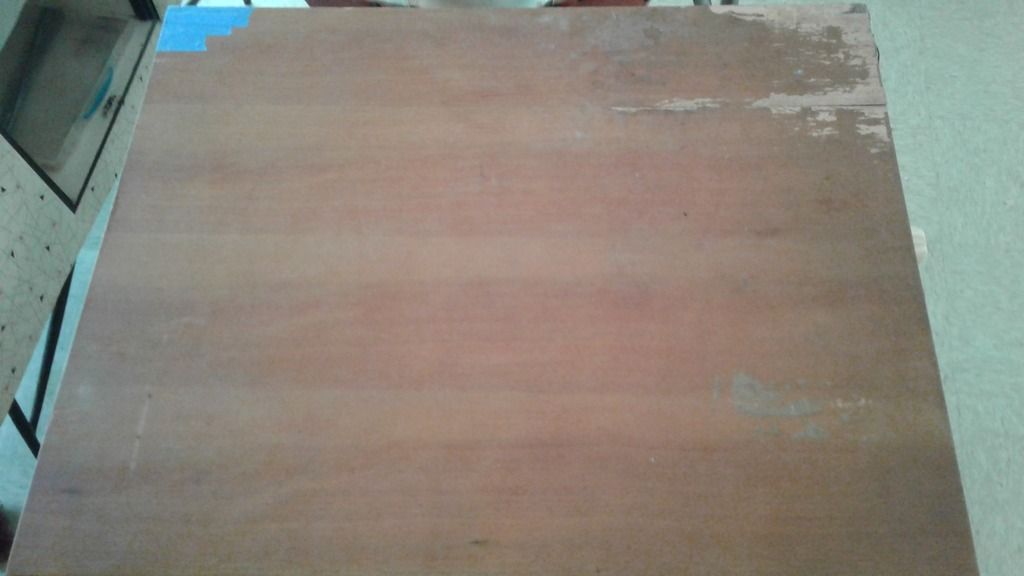
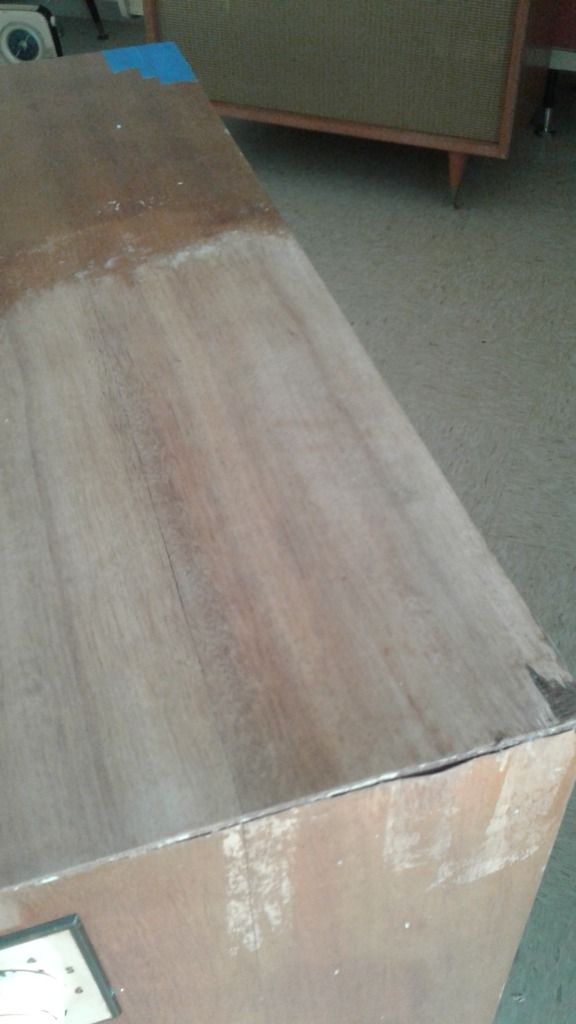
: bad fading on the Top
: loss of finish from top and 1 side
: loss of colour
: crazing
: 6 inch air bubble from water damage on the left side
: Its original and untouched.
: The Ply frame structure is very good and surprisingly so is the right side of the cabinet.
Apart from the veneer splitting and falling off ,this cabinet is good condition.
The other reason Ive picked this cabinet is because I have to get it out of the kitchen , I've already got 3 tellies and a Kriesler Radiogram getting restored in the kitchen!
THE AIM AND OBJECT OF THE CABINET RESTORATION
The Aim is to Restore the cabinet back to how it was done originally and how it looked on the shop floor .
This means that what ever finish they have chosen to use in 1957, Then thats the finish we will put back on it.
The other Reason is to show people who are interested in the how to do's,,,, Of cabinet finishes and want to know more about it.
After we finish it ,my friend Ian Robertson from VR will have a look at the chassis and see if it has any possibilities of showing Here's Lucy again. Ian has not seen the chassis yet so I have no idea if it has any hope or not,,,The crt or the FB could be stuffed ? If so ,well it doesn't matter we restored it here together and its here with all my other vintage TVs in vintage TV Heaven!
THE PREVIOUS INFORMATION REGARDING HOW TO DO THIS PROJECT IS IN MY OTHER POSTS
:Stains and Grains
https://vintage-radio.com.au/default.asp?f=14&th=28
:How to know what veneer is on your Radio cabinet
https://vintage-radio.com.au/default.asp?f=14&th=26
: Paint stripper Awareness and warning
https://vintage-radio.com.au/default.asp?f=14&th=27
: How to determine what finish is on your cabinet
https://vintage-radio.com.au/default.asp?f=1&th=1186&offset=2#9741
NOTE HERE THAT,
The Veneer on this Cabinet must be restored and not replace , ,because it is not available anymore. Its the 1950s tung and groove or floor board look and I have not seen that in many years and although there is another way around this issue ,I want to save the original veneer.
It will look striking when finished!!
A WORD OF WARNING
Once you put a solvent or a stripper on any cabinet you are re-activating chemicals that are 60, 80, 100 years old ! Who knows what they put on it ! So pop a mask and Goggles on etc etc, and do it out side.
Little kids are fascinated by sawdust and paint shavings so pop em in the bin for me please !
THINGS NOT TO DO
1: Dont use a Rotating sander on cabinets , Because it leaves swirl marks going against the grain and you cant get rid of them
2: Dont use a Heat Gun for stripping ,because it will lift the veneer.
3: If the Timber is uncoated and bare Timber , Dont use dry steel wool on it.because it will leave Iron Stains
Steel wool is fine on finishes or removing them when its wet with solvent.
On dry bare Timber we use dry sand paper .
4: dont use black bristle paint brushes for paint stripping,because the dye comes out onto your veneers
Use clear ones that are suitable.
5: dont sand the finish off, Do a Tac test as I've mentioned in my other posts and I will explain again later in this post.
:Think Chemically
Eg
If it is Shellac than it is Alcohol base and metho will remove it
If it is Nitrocellulose than it can be re Activated and will desolve with Lacquer thinner or Acetone.
PLEASE NOTE
Lacquer thinners is NOT paint thinners !!
Lacquer Thinners is volatile stuff and comes with many warnings from breathing it to fire hazard and health risks and this is one of the reasons why Nitrocellulose is being banned in many places.
If it is Oil Varnish than as ive said in other posts,Oil Paint is basically Varnish with pigments in it and you remove that with Paint stripper , but the right one !
Oil Varnish is thinned with Turpentine, but because it dries to a very hard finish you use stripper to remove it.
Other oil finishes such as Danish oil have a small amount of varnish or polyurethane in them to make them dry. If they didn't then we would grow daisies on our chest waiting for them to dry.
Modern polyurethane finishes being 1 or 2 pack dry to a rock hard surface and cant be re activated and you use stripper to remove them.
But here we are only interested in doing the Traditional finishes. I only added that in in case your trying to remove the modern finish .
CUP, MARKS, RINGS ,STAINS
And Stubborn marks.
Once again ,we must think Chemically and not just grab a sander and ho into it.
The veneers may be as thin as 0.6mm depending on the Era it was made. If you sand through the middle of a panel of veneer its going to be a bad day in the shed! And the next day is going to be even worse.
The other issue of sanding stains is you can sand them deeper into the veneer.
If its black dark stain then it more than likely will come out with Oxalic Acid. Most stains come out with this bleach as described in my other posts.
If its a white mark it may be a water mark and can be removed with metho.
PUTTY PATCH UPS
If you need to use some putty to patch a chip etc etc, pick a colour the same as the cabinet, now the problem here is 2 things, 1 putty has no grain. 2 timber is not one colour tone it changes so its best to mix 1 ,2,3 putties together and get tones.
One way around the grain problem is to buy a Chinagraph pencil, A China Grease pen,, $5 off the net in any colour you need and draw the grain on the putty repair with the Grease pencil then continue putting your top coats on.
THE DREDDED BLACK SPOT
This is a type of mould that grows on many timbers and loves Radio cabinets ,,,"The heat "!! It will also appear if too much time goes by in the stripping and re coating process. You see it all the time on Cabinets. Any furniture finisher will tell you that Oxalic Acid is the way to get rid of it..The problem is it comes back and then its problem .!
I have have my own Recipe for it and your welcome to it and it never comes back again .
1 Wipe with Antifungal Antibacteria clothes wash from woollies ,straight out of the bottle ,dont dilute. $8
2 when dry ,wipe with metho to neutralise it
3 Then Oxalic Acid
4 When dry ,,Then Metho to neutralise it
TERMINOLOGY WARNING
Be carful because the terminology for finishing products is an absolute nightmare in Australia!!
Here are a few to watch out for :
:Lacquer thinners is NOT paint thinners and it is NOT Acrylic Lacquer Thinners.
It is ""Lacquer Thinners""
: Harware products are all called Lacquer, no matter what base it is ! If it dries clear and hard then they stick a label on the Tin and call it Lacquer !
They do not sell the type of lacquer on vintage cabinets which is Nitrocellulose Lacquer. Paint shops do!
Another thing you hear around the place, particularly in the music industry is that Nitrocellulose Lacquer allows the Timber to breath?? Nonsense!! Its dead! The breathing Veneers ?.,sounds like a 1950's Sci fi movie.
: similar with Varnish.
If you walk into a hardware and say ,I want a tin of Varnish then he might send you home with any base varnish.
What you say is , Do you have A traditional clear Oil Varnish in an Oil base??? and he should send you home with a Tin of Bondall etc , etc, .
The best way around all these problems is just think Chemically in terms of bases and ask one simple question.
Whats it's thinned with mate???
Then you will know what structure it is and you"ll have your answer.
Ok lets start ! Put the mask and Goggles on your wife and take her to the Cabnet 😆
😠
STEP 1 RECORDING THE INFORMATION ON THE FINISH
1 Get a Magnifing glass and spend a few minutes gathering some information
2 what colour is the Grain filler?
3 what type of stain is it ? Can you see through it like a dye stain ? Or is it more of an opaque and smeared like a pigment stain?
4 look inside the cabinet for Dabs or splashes left by the finisher , most finishers leave a Dab about for this very reason.
Now , heres a good trick for you if your new at this,, you can use this trick as a point of reference when it comes time to matching the filler or the stains .
Go to Bunnings and go to paint section. Now go to the section with all those lovely FREE paint colour charts and you will see thousands of small paper colour samples.
There free! so stuff ya pockets full of them !!
Now take them home and find one that matches the grain filler and one that matches the general colour and tone of your cabinet.
And now you have a point of reference long after you"ve stripped that cabinet. .😲
This might sound silly to you? But furniture finishes do things similar to this when we need to keep a point of reference , but you dont have stain samples or filler samples so those little paper samples are the next best thing and if your new to this you will find this a great help.its very hard to remember colours after you"ve stripped them off.
TIP
Use a Torch to see the grain colour with a Magnifing class.
The Torch will shine through the stain showing the colour of the Grain filler.
STEP 2 DETERMINE THE TYPE OF FINISH THATS ON THERE BY DOING THE TAC TEST
1: Test for Shellac first by putting a few drops of Metho on the finish on the side of the cabinet and play with it with a small brush if its Shellac it will melt the finish .
If not then test for Nitrocellulose Lacquer by doing the same test but use
Lacquer thinners.
If it is Nitrocellulose then the finish will desolve with the Lacquer thinners fast.
If the finish just turns to a thick glue type mess than it is pointing to an Oil Varnish.
Other characteristics that may help you identify the finish would be that both nitrocellulose and oil varnish of the early era turn yellow with time and oil varnish is a much harder and thicker finish.
Shellac scratches easy and you will see the finish is worn off from scratches.
Once you have determined what finish it is ,,, leave it on for the time being.
STAGE 3 REPAIR THE DAMAGE BEFORE WE STRIP
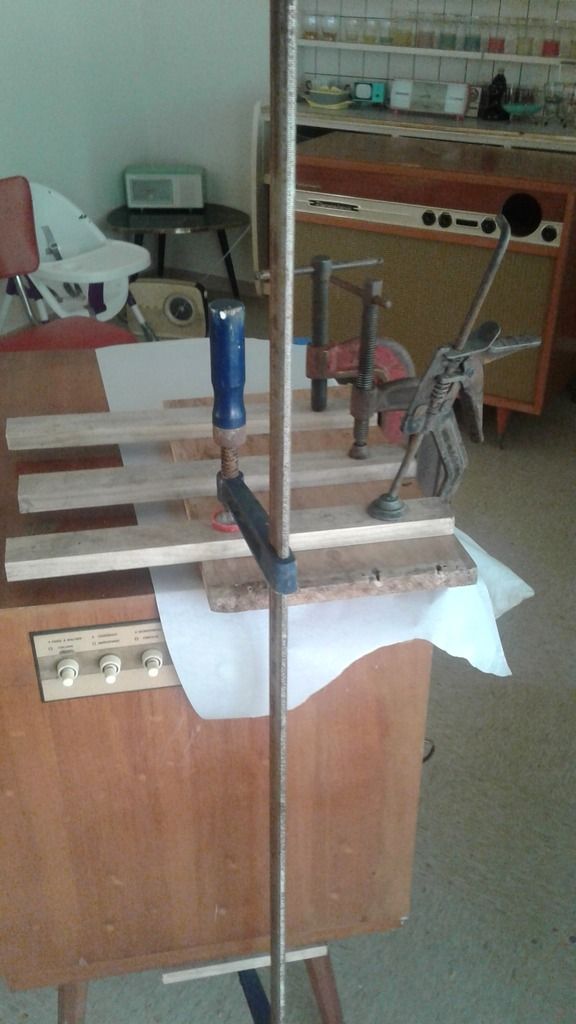
If the cabinet has loose or splitting veneer than we need to repair it first before stripping otherwise its going to get much worse so for repairing the veneer just go through these steps and be gentle until we get a good soild base cabinet to work from. There is a few ways to do this ,but I have to take into consideration what tools you may or may not have ,so we will just stick to clamp and preussure method ,which is fine for these little veneer repairs. I have a tool called a veneer hammer ,which you dont hammer with! You drag it to remove the air out and get the veneer nice and flat...but you wont have that so lets just do it this way in steps
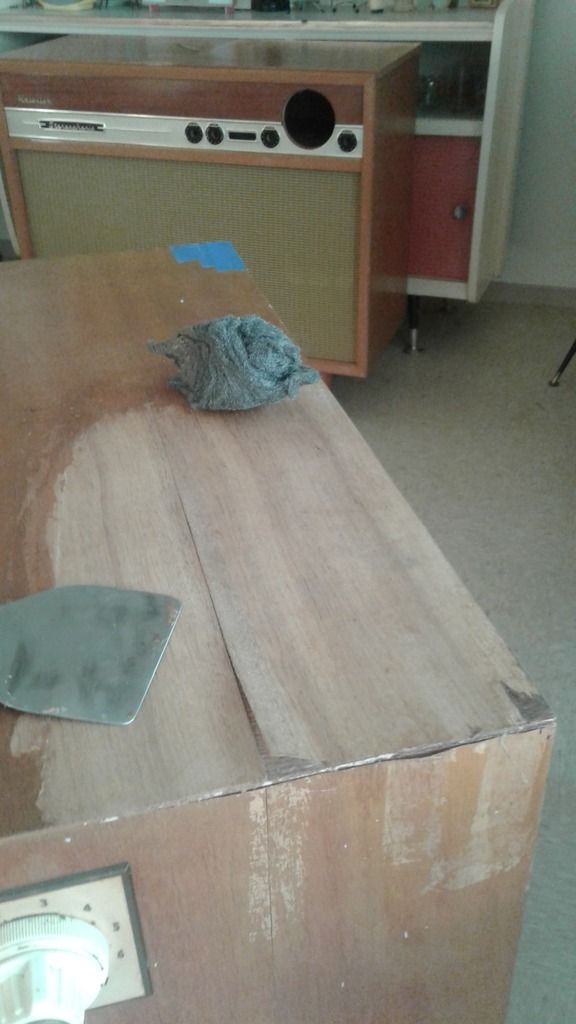
1 : remove the finish from around the the damage veneer. With the appropriate solvent that was determined in your Tac test..use steel wool in one direction and a round edge scraper. If your using stripper here leave it on for 2 minutes only and just do the process twice, ,removing it with metho and steet wool .Dont get stripper on the bare timber where there is no finish as it will darken the veneer by burning it, To prevent this,,, dampen the bare damage Veneer with water damp cloth,,, Also its wise through this process keep a metho wet rag where you can grab it fast to neutralise any paint stripper fast.
PLEASE NOTE !!!!
The paint scraper I use ,I've cut the corners off it and sanded them to a Dull round curve so it wont damage Veneers , A must do !
2: once the finish has been removed from the repair area. Wipe it down with metho.
3: now wet the veneer with water using a wet rag ,get it nice and Damp so its pliable and not brittle.
NOTE THE WATER WILL NOT STOP THE GLUE DRYING.
4: ONLY PUT Good old fashion Selleys Aquadhere glue under any areas where the veneer needs to be repaired.
5: now after putting the veneers back in place . Get your Damp cloth wipe and wipe firmly in ONE DIRECTIOND off the cabinet.
6: now using a house hold clothes Iron OFF AND UNPLUGGED, smooth the veneer flat and only go in ,one direction. Only a couple of times.!
7: now clean the veneer with the damp water cloth in only one direction.
8: lay Grease proof cooking paper down on top of your veneer. If you dont then the clamping board will stick to your veneers and stuff them.
9: put a board on top of the paper and Clamp it down for 8 hours.
SEE THE PROBLEM HERE
The 3 boards on Top should be turned up the other way to ensure the pressure is flat.
But in the case ,it was not possible due to a bracket in the cabinet making it difficult to open the clamps up wider.
Another note , As this is a TV, I stuffed pillows inside it ,to protect the CRT and chassis in case a clamp fell off.
Then remove the board and repeat the process to the next damage peice of veneer.
Just do one at a time and as you can see that section is repaired and now move onto the next peice of veneer that needs to be repaired and no sand paper was used to strip this section and it took less than 5 minutes to get it back to bare timber thanks too a Tac test.
Well Guys I have about 8 damage veneers to repair on this Cabinet before it can be stripped ,So I will go and do that while you'er digesting this and the next post I will start on
:Colour matching
And then stripping.
I will also be showing you how to replace missing veneer.
Ok , hope you got something out of it ,
Pete
|
|
|
|
|

|
Location: Tamworth, NSW
Member since 6 April 2012
Member #: 1126
Postcount: 466
|
Good write up Pete. Looking forward to part 2
Ben
|
|
|
|
|
|
|
Location: Albury, NSW
Member since 1 May 2016
Member #: 1919
Postcount: 2048
|
 Ben. Ben.
Hello Ben Thank you glad you liked it.
Its a bit of fun for us !
I have a couple of Trades,But I never regretted learning this one ,because it makes no difference if ya 20 or 100 ! You can still do it and the old ways just keep going around.
Tamworth ! My family was from Attunga long ago.
All the best,Pete
|
|
|
|
|

|
Location: Belrose, NSW
Member since 31 December 2015
Member #: 1844
Postcount: 2372
|
Pete that's a real eye-opener for me!
I refinished my AWA that had very bad water damage and de-laminated ply without the benefit of your knowledge - now I know why it was so hard!
One question though - wouldn't it be easier to pull the chassis, tuner, CRT mask and glass out first? It's also easier to work on the chassis when it's out of the cabinet. You need to organise a safe way to hold the CRT in its mounting harness though. I use a cardboard carton and polyethylene foam packing pieces - we have lots of these where I work.
|
|
|
|
|
|
|
Location: Albury, NSW
Member since 1 May 2016
Member #: 1919
Postcount: 2048
|
Ian
G Day Ian,
Yep mate no problem .I can pull that out,, pack it up and bring it to your place. I might get some packing stuff off you though! I will phone you on monday.
As for your AWA cabinet, it can be tricky to get it right.
Next time you have a cabinet you want done,,,,just give it me and ill be happy to do it for you.
Ok phone you on monday.
Pete
|
|
|
|
|

|
Administrator
Location: Naremburn, NSW
Member since 15 November 2005
Member #: 1
Postcount: 7307
|
A very good article. Pete, until I finally get the issue surrounding the server 500 error timeouts nutted out I'll suggest that you type up any large articles in Notepad and then do a copy/paste to the site. I'd hate for you to go to the efforts you did today only to lose the lot in a few seconds.
‾‾‾‾‾‾‾‾‾‾‾‾‾‾‾‾‾‾‾‾‾‾‾‾‾‾‾‾‾‾‾‾‾‾‾‾‾‾‾‾‾‾‾‾‾‾‾‾‾‾‾‾‾‾‾‾‾‾‾‾‾‾‾‾‾‾‾‾
A valve a day keeps the transistor away...
|
|
|
|
|
|
|
Location: Albury, NSW
Member since 1 May 2016
Member #: 1919
Postcount: 2048
|
Brad,
Thank you Brad, should be fun to do it here on VR.
As for note book, I cant I did all this on a cheap 80 buck tablet.
I dont have a computer. I will copy it to gmail and save it to drafts .
Wise thought Brad.
Pete
|
|
|
|
|

|
Location: Toongabbie, NSW
Member since 19 November 2015
Member #: 1828
Postcount: 1251
|
Hi Pete, very informative!
I would have just nailed the veneer down with aquadhere, bogged the missing bits up, hit it with the orbital sander and sprayed gloss over the lot!
And what I would have finished with would have been tarted up scrap wood.
Looking forward to the next installment.
Cheers, Fred.
|
|
|
|
|
|
|
Location: Albury, NSW
Member since 1 May 2016
Member #: 1919
Postcount: 2048
|
Gee Fred, You must of worked for PYE. They finished all their TV cabinets in that process.
I'm always very wary when stripping a PYE TV cabinet as to what they have lurking under the top coats!
Pete
|
|
|
|
|

|
Location: Laidley, QLD
Member since 16 September 2015
Member #: 1799
Postcount: 114
|
Many thanks Pete.
Just what I needed.
I have a couple of AWA's and Kriesler's that need various amounts of repair to the cabinets.
plus a lot of consoles and table radios that, once the new shed is set up will require constant reference to your notes.
Cheers.
Peter.
|
|
|
|
|
|
|
Location: Albury, NSW
Member since 1 May 2016
Member #: 1919
Postcount: 2048
|
Hello.
I can make Kriesler stains for their TVs and Radiograms if you need a match.
Pete
|
|
|
|
|
|
|
Location: Laidley, QLD
Member since 16 September 2015
Member #: 1799
Postcount: 114
|
Thanks Pete, Will keep that in mind.
Been busy reading your write ups at work during the lunch hour, when I could get access to the site, with the server errors, working brilliantly today though.
Now I sits and waits for Part 2.
Cheers
Peter.
|
|
|
|
|

|
Location: Werribee South, VIC
Member since 30 September 2016
Member #: 1981
Postcount: 470
|
I wish I'd had this thread to read before I restored my W101A PYE cabinet.
I used a scraper made of an old saw blade which you hold with both hands and bow slightly whilst dragging across the surface away from your body.
A chippy friend of mine told me about this method and loaned me the scraper.
By adjusting the pressure you can very accurately control how much material you take off.
I was able to strip down to the veneer surface without going through it very easily. However I think I prefer your method as would have been much quicker.
Several pieces of veneer were missing form my cabinet at the edges and at the speaker opening.I used colour matched filler to repair those areas.
I should have used a grain filler before finishing as the surface now has very slight non uniformity but nevertheless is quite acceptable however after reading your method I would approach it very differently if I was doing it now.
I bow to superior knowledge.
I look forward to your next chapter.
Cheers.
|
|
|
|
|
|
|
Location: Albury, NSW
Member since 1 May 2016
Member #: 1919
Postcount: 2048
|
The old Saw blade is a very old method and dates back many years , not so much for furniture but for stripping very large areas.
Ive never tried it ,but I know of it. .only old school bushies would know about it now.
|
|
|
|
|
|
|
Location: Laidley, QLD
Member since 16 September 2015
Member #: 1799
Postcount: 114
|
I can relate to the sharpened hacksaw blade device.
My second car was a 1960 AP3 Chrysler Royal, It had some rust issues and was missing the floor pan on the drivers side, The bloke that lived next door, when I was a teenager, helped me restore the car, and I picked up a lot of tips and alternative ways of doing things including lead filling and using the sharpened hacksaw blade was a brilliant way to get the profile, maybe not as quick, but the control it gave you over how much material you could remove was great for the many curved areas.
Used the same methods for the other cars including the last two Pontiac's a 1966 Parisienne and the 1952 Chieftain, sadly they were sold along with all our 1940's, 50's and 60's collectables back in 2000, paid the deposit to build a house, so it wasn't wasted, still missing the Chieftain though.
Cheers
Peter.
|
|
|
|
|
|
You need to be a member to post comments on this forum.
|

|
|


