|
STC Console Radio Model 56?
|
|
|
|
|

|
Location: Toongabbie, NSW
Member since 19 November 2015
Member #: 1828
Postcount: 1250
|
Hi George, that radio is one beautiful machine.
You are fortunate in that it looks original from outside and the top of the chassis and nobody has stuffed it about.
I hope the underside of the set (do you have a photo?) is as untouched.
I am not qualified to comment too much about the woodwork as my idea of finish is to sand it back and spray on clear coats of automotive paint.
The other guys are much better equipped to advise you about the correct techniques to RESTORE the wood finish.
For an idea of the amount of work to RESTORE a chassis, on this site, click on the special projects button scroll down and select 'restoring a Kriesler 3K15 receiver'. Here I stripped the rusty chassis down to bare bones and rebuilt it to working state trying to keep the original parts as much as possible but obviously replacing damaged or age ended parts. The chassis was painted and parts sprayed to emulate the original finish and you will see a photo of the "kit of parts" ready to reassemble. Just avert your eyes when you get to the bit about the cabinet, or take that as an example of what not to do!
Your chassis is a bit simpler and would be an ideal candidate for RESTORATION in the same manner.
You will note I keep shouting using the word RESTORE because some peoples idea or restoring a radio (I call them cabinet polishers) is to shiny the cabinet up then pull the chassis out make it work by replacing some dead parts and then spraying the whole thing with silver paint so it looks pretty, polish the valves and put it back together. That's called making it work again by fudging, please don't go in that direction!
You may elect to get the chassis back to safe running condition and CLEAN it up without applying any paint or altering the finish. To me that's just as applicable and I have done that to sets to maintain the original chassis markings that may also include a testers signature in pencil. That's a 'SENSITIVE RESORATION'. On such sets I have applied a clear coat over the original markings, decals ect to preserve the lot.
There's a lot to learn by restoring a lovely old set like this. While I am not a radio restorer and was never in the trade you will see by my adventures chronicled in 'special projects' I have learnt a lot in the last couple of years using my wits and a general background in electronic design to cover, fixing, restoring and making various projects.
Good luck.
Fred.
|
|
|
|
|

|
Location: Albury, NSW
Member since 1 May 2016
Member #: 1919
Postcount: 2048
|
A safe sensible approach to determining the condtion and the best process to restore or repair any rare furniture finishes is to clean it and re-activate the finish enough to see its true colour and condition.
After doing this you can than make a decision much better.
Once the, fat, dust, nicotine, and grime has been removed and you can see it in its true colour again.
Now there are many ways of doing this and I have many home brews , but the best way for a person who may not have done this before is to go buy a tin of Howards Restore a finnish in the colour clear for this purpose and to start with some Grade 0000 steel wool.
Gently rub up and down going only with the grain and the then after a few seconds wipe it off with a white cloth going up and down with the Grain.. use a white cloth so you can monitor what is going on the Timber and whats coming off it.
This process takes about 30 minutes to do a cabinet and its not Restoring it , only cleaning it and activating the finish enough to make a decision about the best way to Restore or Repair it.
In the furniture industry we call it the ebay finish , because it makes the furniture look great and you can have on ebay the same day you bought it at Auction.
You cant buy it at Bunnings.
You can buy it at Lane cove on Centennial Ave at Claphams Antiques.
When ever we are working with Rare furniture its always better to take baby steps and then make a decision after we know what we have.
Pete
|
|
|
|
|

|
Location: Wangaratta, VIC
Member since 21 February 2009
Member #: 438
Postcount: 5254
|
It is highly probable that the finish on that is a NItrocellulose one. IF it is do not go any where near it with Methylated spirits.
You can take a photo of the inside of the pan & should before you touch it. Circuit is not hard to find 59 chassis is the horror. This will be one I think is Autodyne with the volume control in the cathodes. Do check it I have had to replace several.
Marc
|
|
|
|
|

|
Location: Sydney, NSW
Member since 22 May 2017
Member #: 2114
Postcount: 120
|
Thanks Fred, I am quite happy with this piece as it is in its original condition and even under the chassis looks orginal to me, one or two new solder points, I will attach a photo first chance I get. Please give me your opinion if you think it has been tapered with.
I will definitely go look at some of the projects you refer to, I can assure you I have no plans of spraying the chassis with silver paint etc.
Though I do want to make it safe and have it working to the highest standard for this.
Cheers
|
|
|
|
|
|
|
Location: Sydney, NSW
Member since 22 May 2017
Member #: 2114
Postcount: 120
|
Hi Pete,
Thanks again for you input, I cam to the same conclusion, to first clean this unit and use some fine steel wool. I was not sure what to use as a cleaning solution, are you suggesting to use the Howard Restore with the still wool? Or use it after the clean? If after, what do you suggest as a cleaning agent?
|
|
|
|
|
|
|
Location: Sydney, NSW
Member since 22 May 2017
Member #: 2114
Postcount: 120
|
Good day Marc, I did read somewhere else about the use of Nitrocellouse, how does one confirm if this is what it is? If it is other then Methylated spritis are their any other cautions in dealing with this or does it have an impact the suggestions given by Vintage Pete above.
I am new to this when you refer to the Pan can I assume you are refer to the underside of the Chasis? Can you also clarify you last sentence please.
Do you also happen to know what the Decal dial indicator on the front is made of?
Cheers George
|
|
|
|
|
|
|
Location: Albury, NSW
Member since 1 May 2016
Member #: 1919
Postcount: 2048
|
Hello George,
During this Era 3 finishes were being used.
1 shellac
2 Nitrocellulose
3 Oil Varnish.
They are all wonderful finished but all have a different base.
Tonight I will write a post on how to do a Tack test to give a good indication to what finish is on your Cabinet.
I will also write out the process to fresh it up and clean it all the best , Pete
|
|
|
|
|

|
Location: Belrose, NSW
Member since 31 December 2015
Member #: 1844
Postcount: 2371
|
As far as the chassis resto is concerned, I have done a number of rusty chassis as complete strip-downs. You can get an as-new appearance if that's what you want, with repro decals on the chassis.
It's easy enough, the circuit is very simple.
Take lots of photos
Drill out the valve socket rivets, leaving most of the wiring as a complete assembly you can remove in one piece, except for the IFTs of course.
Melt the guts out of the paper caps in the oven and install new parts inside the old sleeves, with longer leads. Seal the ends with hot melt glue, it looks quite authentic.
Wire brush or bead blast the chassis as needed and paint in original colour. Most other chassis parts can be wire brushed and suitably finished to match original.
I have original vector-mapped files for a number of period scanned decals if you need.
If you have the original can electros (you do! Lucky you!) you can hide modern parts inside them. If not, Berocca vitamin cans, paint stripped, make good replicas. Use a large bolt through the lid and drill a 4mm hole through the middle of it to bring the + side out. These things stand a close examination before anyone would realise they're no kosher, believe me!
Enjoy!
I know it's sacrilege to some of you, but I'd be very tempted to:get rid of the cranky autodyne converter, fit AVC, a diode detector hidden in the 2nd IF can and a proper volume control. While keeping the original appearance of course. The performance of those radios in their original form when receiving modern AM transmitters with 110% modulation in a marginal reception environment is just too primitive for my tastes.
|
|
|
|
|
|
|
Location: Albury, NSW
Member since 1 May 2016
Member #: 1919
Postcount: 2048
|
Hello George
Ok a Tac test to indicate what finish is on your cabinet works like this
Shellac is alcohol based "metho"
1/ On the side of your cabinet in a spot that wont been seen.put a couple of drops of metho on the finish. After a couple on minutes Dab it with a small paint brush .
If the finish melts than the finish is Shellac .
2/ Nitrocellulose is a Lacquer and there for it is Lacquer thinners based so you do the same test but with Lacquer thinners to determine if it is a Nitrocellulose finish.
At this stage just test for those two finishes.
Both Shellac and Nitrocellulose finishes have their good and bad points.
Shellac is a traditional finish ,but has some draw backs
1 it cant get wet with cups etc etc as it will leave white ring marks,
2 it scratches easy.
3 it does not offer the protection that other finishes can.
4 but it is a safe non toxic finish and one that can be done at home with basic tools.
5 A shellac finish can always be Removed easy.
Nitrocellulose, we call it Nitro.
Has good and and bad points too,
1 /It is a superior finish as it can be tinted with tints and sprayed on nice and thin which is very important with musical instruments.
Nitro has sound quality and this is why Guitars builders persist in using it.
It also has a Amber colour to it which ads warm and makes the cabinet still apear old.
A Nitro finish can often be repaired by re activation using thinners again.
But it has some bad points as well . It cracks , Crazing, when this happens we dont call it cracking we call it checking and in many situations this is good and ads appeal to Antiques, but not all.
A Nitrocellulose finish will crack and crazy at some point in time , this can be in 6 months or 20 years there is no way of knowing when , because it depends on room temperatures etc etc.
The other thing that Nitrocellulose finishes do is they also turn yellow with time , now once again this is good and bad depending on the item ,because age is often what we are looking for.
Nitro is also Toxic and its becoming hard to buy and in many countries its banned.
But here in oz you can buy it still.
I love nitro finishes because its a beautiful finish in a gloss finish that not much else can match and it sprays nice out of the gun.
I have nitro finishes here that are 30 years old with no checking yet.
Just a note here, a modern finish like polyurethane, 1 or 2 pac will never give a finish like the 3 traditional finishes used on Radiograms. it just never looks right.
Ok,, you will be surprised how good your cabinet is after you do the following, just keep in mind what I said ,use 0000 grade steel wool and only go in the direction of the Grain ,Than wipe it off with a white cloth. After this is done you will see the beauty of the veneer and its true colours , it maybe walnut veneer?
Do a test on the side first as with all products. Oh WEAR A MASK ! Because your re activating chemicals from the 1930s .you might turn into Humphrey bogart ,if you turn into Jone collins ring me!
Follow this earlier post
A safe sensible approach to determining the condition and the best process to restore or repair any rare furniture finishes is to clean it and re-activate the finish enough to see its true colour and condition.
After doing this you can than make a decision much better.
Once the, fat, dust, nicotine, and grime has been removed and you can see it in its true colour again.
Now there are many ways of doing this and I have many home brews , but the best way for a person who may not have done this before is to go buy a tin of Howards Restore a finnish in the colour clear for this purpose and to start with some Grade 0000 steel wool.
Gently rub up and down going only with the grain and the then after a few seconds wipe it off with a white cloth going up and down with the Grain.. use a white cloth so you can monitor what is going on the Timber and whats coming off it.
This process takes about 30 minutes to do a cabinet and its not Restoring it , only cleaning it and activating the finish enough to make a decision about the best way to Restore or Repair it.
In the furniture industry we call it the ebay finish , because it makes the furniture look great and you can have on ebay the same day you bought it at Auction.
You can't buy it at Bunnings.
You can buy it at Lane cove on Centennial Ave at Claphams Antiques.
When ever we are working with Rare furniture its always better to take baby steps and then make a decision after we know what we have.
Pete
|
|
|
|
|

|
Location: Sydney, NSW
Member since 28 January 2011
Member #: 823
Postcount: 6687
|
Very good tips, Pete.
I've put a tracer link to this thread in the Cabinet Repairs forum.
|
|
|
|
|
|
|
Location: Albury, NSW
Member since 1 May 2016
Member #: 1919
Postcount: 2048
|
Oh thanks GTC,
I love my veneers , good for the soul working with timber,
No stress to it, not like cars or high stress jobs in sales etc etc,
|
|
|
|
|
|
|
Location: Sydney, NSW
Member since 22 May 2017
Member #: 2114
Postcount: 120
|
Thanks Pete fro the detail on different types of finish.
I tried the methylated spirits on a small patch at the bottom, did not seem to melt. I do not have any lacquere thiner, so will need to get some.
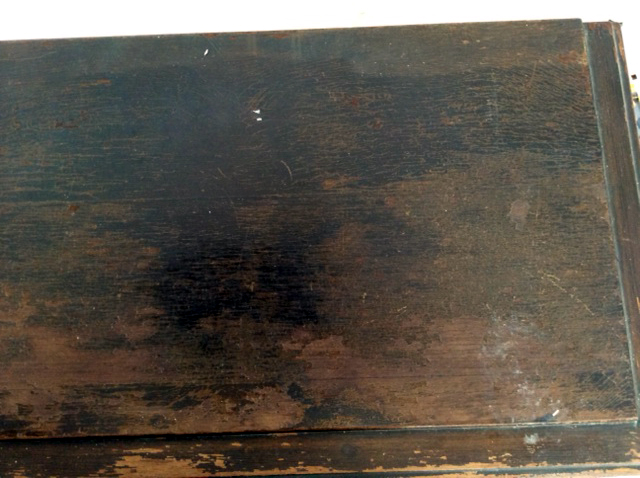
I have taken a picture of the top which I have asked to be uploaded, what do you think ? Will Howards Restor A Finish help recover this or is it too far gone?
I am planning to pick some up tomorrow, also the previous picture post of the front with the decal, will that come up ok with Howards?
Thanks once again for your time and effort in your responses.
|
|
|
|
|
|
|
Location: Albury, NSW
Member since 1 May 2016
Member #: 1919
Postcount: 2048
|
Hello George,
Ok, we are making progress.
Now do the same test, but this time use "Lacquer " thinners ,bunnings has that !
When you do the Test, its important to note
1 does the finish dissolve?
2 Or does the Finish just turn to a Glue like substance often being yellow in colour and very thick ?
I will wait for your photos to be uploaded so I can see what needs to be done regarding your other questions .
All the best , Pete
|
|
|
|
|

|
Administrator
Location: Naremburn, NSW
Member since 15 November 2005
Member #: 1
Postcount: 7301
|
Photo uploaded to Post 27.
‾‾‾‾‾‾‾‾‾‾‾‾‾‾‾‾‾‾‾‾‾‾‾‾‾‾‾‾‾‾‾‾‾‾‾‾‾‾‾‾‾‾‾‾‾‾‾‾‾‾‾‾‾‾‾‾‾‾‾‾‾‾‾‾‾‾‾‾
A valve a day keeps the transistor away...
|
|
|
|
|
|
|
Location: Albury, NSW
Member since 1 May 2016
Member #: 1919
Postcount: 2048
|
Photo is there now so I can get bit more information.
NOTE, see how the finish has lifted from the Timber leaving the Timber bare!
This indicates that the colour stain was put into the clear coat rather than on the bare wood.
This Technique is called Toning and used in a Nitrocellulose finish and often an Oil Varnish too, But a oil Varnish stain will enter deeper into the Timber ,because its an Oil and Thinned with Turpentine.!
Generally a Shellac finish the Stain goes down on the bare Timber then the clear coats go ontop.
Toning wis used because its a fast way to get a cabinet one even colour on every panel.
There are 2 main Types of Stains
1 Dyes
2 Pigments
Dye Stains are Translucent and go deeper into the Timber and you can see through it and there for it hides nothing.
Pigment stains are more opaque and dont penetrate as deep into the Timer and they are use to hide Grain or Timber that does not match.
Both these can be used in a Toner finish so you can see why a Cabinet factory chooses this method as there is no wastage in Timber thats a bad match.
Just blow a toner on it and its all one even colour on all 4 sides.
So still do the Test.
Also, only use Howards on Timber ,not badges etc etc,
Howards is only to clean this cabinet up so we can get a good look at it and more of an idea of what process needs to be done in order to restore the cabinet.
Well its coffee and a smoke time for me before the kids get up.
Pete
|
|
|
|
|
|
You need to be a member to post comments on this forum.
|