
Cabinet Repairs
Forum home - Go back to Cabinet Repairs
|
Casting replacement knobs
|
|
|
Return to top of page · Post #: 16 · Written at 2:32:37 PM on 15 July 2014.
|
|

|
Location: Wangaratta, VIC
Member since 21 February 2009 Member #: 438 Postcount: 5254 |
|
Sniffing glue may get you into trouble: To me that is something that could be cut out of a perspex |
|
|
Return to top of page · Post #: 17 · Written at 2:36:07 PM on 15 July 2014.
|
|
|
|
Location: Wangaratta, VIC
Member since 21 February 2009 Member #: 438 Postcount: 5254 |
|
This looks to me like something that could be made from Perspex Rod and the hole drilled. |
|
|
Return to top of page · Post #: 18 · Written at 10:41:29 AM on 19 July 2014.
|
|
|
|
Location: Canberra, ACT
Member since 23 August 2012 Member #: 1208 Postcount: 584 |
|
I've started following Scraps' method (see post #7 above) and got as far as embedding the model knob in the mould silicone/shellite mixture in a small disposable plastic tub with about 1cm of the mould mixture on the sides, about .5cm on the bottom. |
|
|
Return to top of page · Post #: 19 · Written at 9:44:15 PM on 19 July 2014.
|
|
|
|
Location: Blue Mountains, NSW
Member since 10 March 2013 Member #: 1312 Postcount: 401 |
|
I usually put them aside for a few days and find something else to work on, as hard as that may be |
|
|
Return to top of page · Post #: 20 · Written at 9:53:42 PM on 19 July 2014.
|
|

|
Administrator
Location: Naremburn, NSW
Member since 15 November 2005 Member #: 1 Postcount: 7301 |
|
Most silicone products have a short shelf life. They will work beyond that up to a point but texture and bond do weaken with age, even when still inside an unopened tube. Bunnings and Masters know this yet still fill a whole aisle with more silicone than they can sell in a year whilst being just about out of stock with other essentials. ‾‾‾‾‾‾‾‾‾‾‾‾‾‾‾‾‾‾‾‾‾‾‾‾‾‾‾‾‾‾‾‾‾‾‾‾‾‾‾‾‾‾‾‾‾‾‾‾‾‾‾‾‾‾‾‾‾‾‾‾‾‾‾‾‾‾‾‾ A valve a day keeps the transistor away... |
|
|
Return to top of page · Post #: 21 · Written at 8:48:53 AM on 20 July 2014.
|
|
|
|
Location: Blue Mountains, NSW
Member since 10 March 2013 Member #: 1312 Postcount: 401 |
|
I've found just a pure silicon works best, nothing fancy, just the cheap stuff. The only difference I found is the time it takes to go off. Some set within a few hours and others take days. From what you say Brad the ones that go off quickly might be older stock. |
|
|
Return to top of page · Post #: 22 · Written at 9:11:36 AM on 20 July 2014.
|
|
|
|
Administrator
Location: Naremburn, NSW
Member since 15 November 2005 Member #: 1 Postcount: 7301 |
|
That may be the case though there's so many types of silicone and its made by about half a dozen different manufacturers so it's not a hard and fast (no pun intended) rule. ‾‾‾‾‾‾‾‾‾‾‾‾‾‾‾‾‾‾‾‾‾‾‾‾‾‾‾‾‾‾‾‾‾‾‾‾‾‾‾‾‾‾‾‾‾‾‾‾‾‾‾‾‾‾‾‾‾‾‾‾‾‾‾‾‾‾‾‾ A valve a day keeps the transistor away... |
|
|
Return to top of page · Post #: 23 · Written at 10:39:01 AM on 20 July 2014.
|
|
|
|
Location: Canberra, ACT
Member since 23 August 2012 Member #: 1208 Postcount: 584 |
|
Further to Scraps' recipe and GTC's links, I have found few sources for different ways to make a mould using silicone. The two below feature very fast-curing recipes using household materials and common clear silicone. |
|
|
Return to top of page · Post #: 24 · Written at 8:39:18 PM on 20 July 2014.
|
|

|
Location: Tamworth, NSW
Member since 6 April 2012 Member #: 1126 Postcount: 466 |
|
I think that in the next few years, with the price of 3d printers falling, this will be a viable option for making knobs and other assorted parts. |
|
|
Return to top of page · Post #: 25 · Written at 12:28:54 AM on 21 July 2014.
|
|
|
|
Location: Canberra, ACT
Member since 23 August 2012 Member #: 1208 Postcount: 584 |
|
Agree 3D printers OUGHT to be a solution, once price is in reach. Other problem is you need a 3D CAD model to feed to the 3D printer, so either a 3D scanner or the skills to create a virtual model from measurements, before the 3D printer can reproduce it. |
|
|
Return to top of page · Post #: 26 · Written at 9:30:10 AM on 21 July 2014.
|
|
|
|
Location: Wangaratta, VIC
Member since 21 February 2009 Member #: 438 Postcount: 5254 |
|
I find it amazing that there is experimenting when, a moulding compound can be bought off the shelf & tried. |
|
|
Return to top of page · Post #: 27 · Written at 12:52:20 PM on 7 August 2014.
|
|
|
|
Location: Canberra, ACT
Member since 23 August 2012 Member #: 1208 Postcount: 584 |
|
Well I tried each of the methods and staggered towards a conclusion that suits me - others may have other priorities. 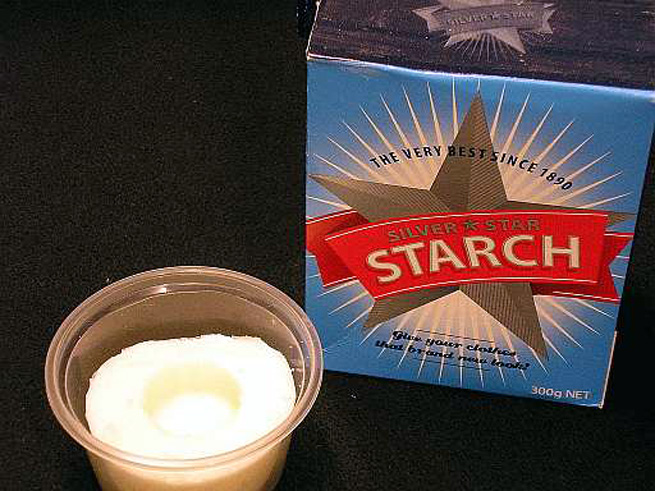 2. Cast: I used the Diggers product. Pros: It is relatively cheap so you can experiment without too much regret. While semi-cured, it can be sawed and drilled quite easily. It is initially the viscosity of honey and will take up all fine detail from a mould. Cons: The catalyst is highly concentrated and measured in drops, so it can be difficult to get the mixture right. Colour has a slight green tinge when cured, so is not a perfect match for a clear plastic knob. If not enough catalyst is used, the compound can cure very slowly. It sets hard enough to take out of the mould within 24hours, but then remains slightly malleable and tacky for a few more days. I got one or two attempts out of shape before realising that. Also can get a cloudy surface if handled before fully hardened. I would recommend adding catalyst at the high end of the instructed amount. Also, due to the shrinkage issue, I found it best to build up a 2mm dam of the mould compound above the level of the model knob, so that the casting compound could be poured in proud of final desired shape. An earlier attempt shrank down into the mould too far. It's easier to take off than add to the final result. 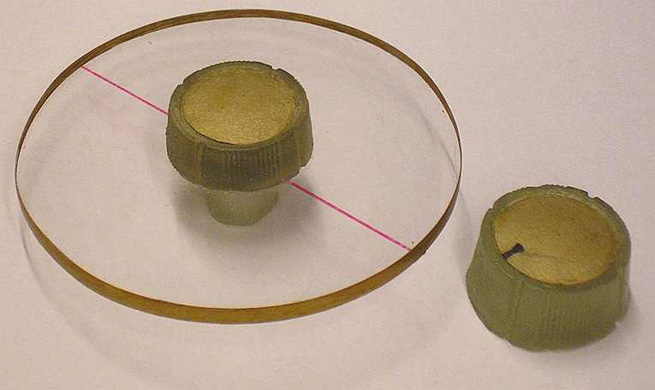 The left channel volume control knob is a good match in dimension and detail, though colour match is not perfect (the close-up photograph exaggerates the green/gold tinge due to local lighting - lower photo is better). On the tuning dial knob, I had no model. The disk is salvaged perspex. I separately cast the top of the knob and also a boss for the stalk of the knob, as this needs to protrude down below fascia level to mate with the tuning condenser axle. I didn't attempt to imitate the knurling on the outside of the disk, so just gave it a ring of gold paint. The hardest thing to match is the faded metallic discs on top of the knobs. I have used the nearest colour I could find in craft paper, glued and lacquered. If I find something closer to the original metal, I will replace it. In position, the knobs are functional and probably as close as my limited skills will get me to a complete match. The lifting hook on the tone arm is also a replacement for a missing original. This is made from one half of the kind of double-sided hasp you use for securing a blind cord.  Maven |
|
|
Return to top of page · Post #: 28 · Written at 1:12:24 PM on 8 May 2015.
|
|
|
|
Location: Australia, SA
Member since 21 December 2011 Member #: 1047 Postcount: 85 |
|
Years ago we used a drying oven to cure araldite, it goes into a very runny state so make sure it is welled up so it cannot run out of the joint and onto the floor. |
|
|
Return to top of page · Post #: 29 · Written at 9:13:09 AM on 25 May 2015.
|
|
|
|
Location: Newcomb, VIC
Member since 24 May 2015 Member #: 1750 Postcount: 7 |
|
Seems to me that knobs and similar small plastic parts would be perfect target for a 3D printer. |
|
|
Return to top of page · Post #: 30 · Written at 2:10:21 PM on 25 May 2015.
|
|

|
Location: Sydney, NSW
Member since 28 January 2011 Member #: 823 Postcount: 6687 |
|
Yes, I expect that 3D printers will eventually be like laser and inkjet printers where the device is comparatively cheap to buy, but then you get ripped off with supply stock. |
|
|
You need to be a member to post comments on this forum.
|
|

Sign In
Vintage Radio and Television is proudly brought to you by an era where things were built with pride and made to last.
DISCLAIMER: Valve radios and televisions contain voltages that can deliver lethal shocks. You should not attempt to work on a valve radio or other electrical appliances unless you know exactly what you are doing and have gained some experience with electronics and working around high voltages. The owner, administrators and staff of Vintage Radio & Television will accept no liability for any damage, injury or loss of life that comes as a result of your use or mis-use of information on this website. Please read our Safety Warning before using this website.
WARNING: Under no circumstances should you ever apply power to a vintage radio, television or other electrical appliance you have acquired without first having it checked and serviced by an experienced person. Also, at no time should any appliance be connected to an electricity supply if the power cord is damaged. If in doubt, do not apply power.
Shintara - Keepin' It Real · VileSilencer - Maintain The Rage