
Special Projects
Forum home - Go back to Special Projects
|
Electronics Australia All Wave IC2
|
|
|
« Back ·
1 ·
Next »
|
|
|
Return to top of page · Post #: 1 · Written at 10:02:49 PM on 11 July 2016.
|
|

|
Location: Daylesford, VIC
Member since 13 January 2011 Member #: 809 Postcount: 326 |
|
This regenerative TRF project, published in the April 1970 issue of Electronics Australia, was my first successful home-made radio. In fact it was the only EA project radio I built that actually worked, even though it was roughly made and I didn't understand the need for an earthed metal front panel; I had to tune it with pair of long nosed pliers. Anyway, feeling nostagic, I bought a kit version of it around 1980, and it sat in bits in a box until this year. One of the reasons for the delay was tracking down all the old parts needed to make it look something like the radio in the magazine. The Aegis MV3/F knobs for example, which turned up in hard rubbish in Melbourne, a proper photo-printed dial, and those unreliable but distinctive "redcaps" typical of the era. Anyway, it's finished and it works. For anyone else who wants to try it, there's a couple of bloopers in the article: the RF board is missing an earth link, and you'll need to add a series 470pF capacitor to the 415pF variable and remove a few turns from the coils to get the tuning to match the dial. This is a fiddly task even though I'm not a "beginner" anymore! |
|
|
Return to top of page · Post #: 2 · Written at 10:22:43 PM on 11 July 2016.
|
|

|
Location: Sydney, NSW
Member since 28 January 2011 Member #: 823 Postcount: 6935 |
|
Photos? |
|
|
Return to top of page · Post #: 3 · Written at 6:18:46 PM on 13 July 2016.
|
|
|
|
Location: Daylesford, VIC
Member since 13 January 2011 Member #: 809 Postcount: 326 |
|
Tomorrow hopefully. I'm just restuffing an old Eveready Nine Lives battery to run it from. |
|
|
Return to top of page · Post #: 4 · Written at 7:29:17 PM on 14 July 2016.
|
|
|
|
Location: Daylesford, VIC
Member since 13 January 2011 Member #: 809 Postcount: 326 |
|
Here are some photos. I've tried to keep the radio close to the original design in the magazine, including the choice of components, but I've made a couple of changes for neatness and practicality. Rather than make a folded metal chassis, something I'm not set up to do, I built a strong wooden frame with two flat panels of thick aluminium bolted in place. I also made the speaker grille round rather than square, and used a toggle power switch for a more visually pleasing control arrangement. 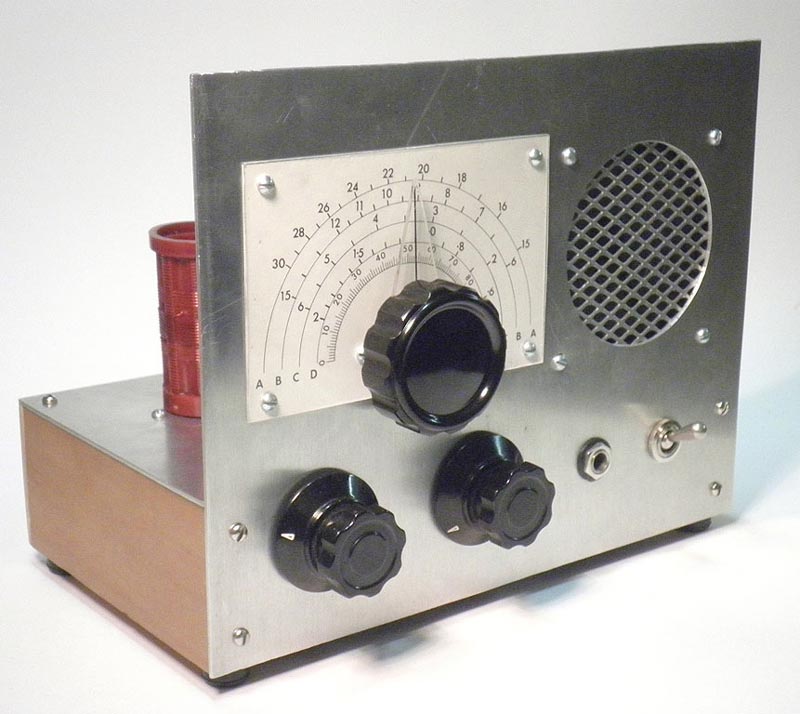 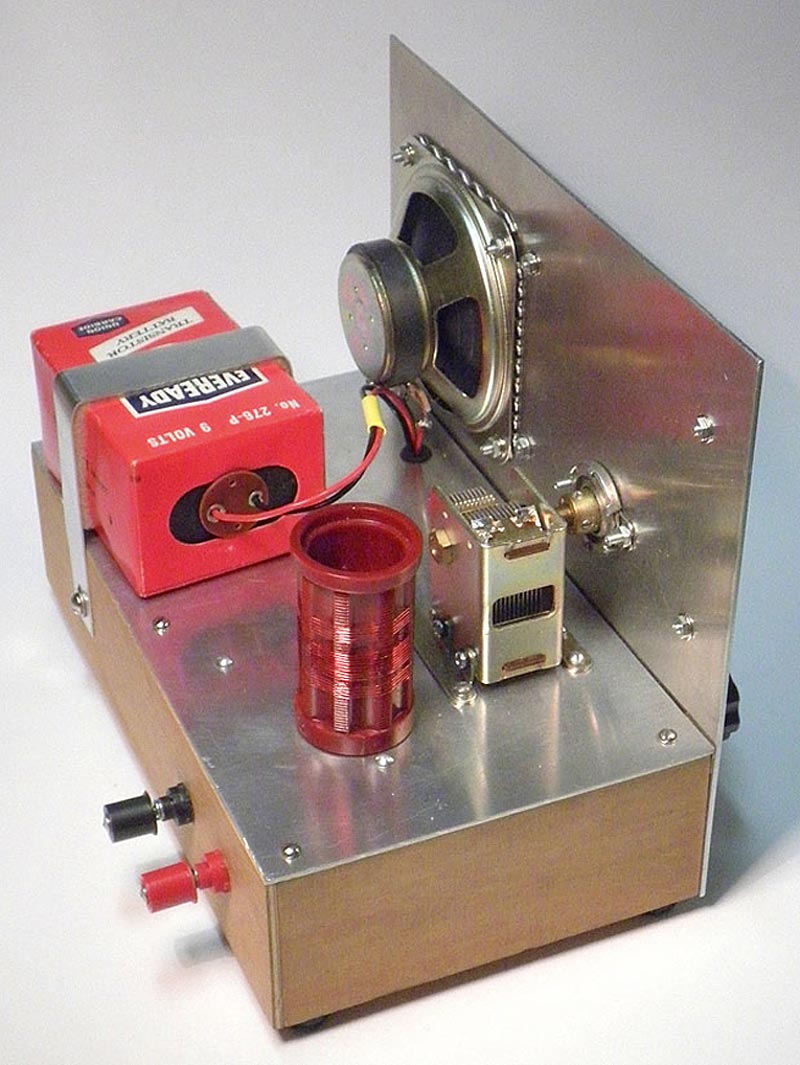 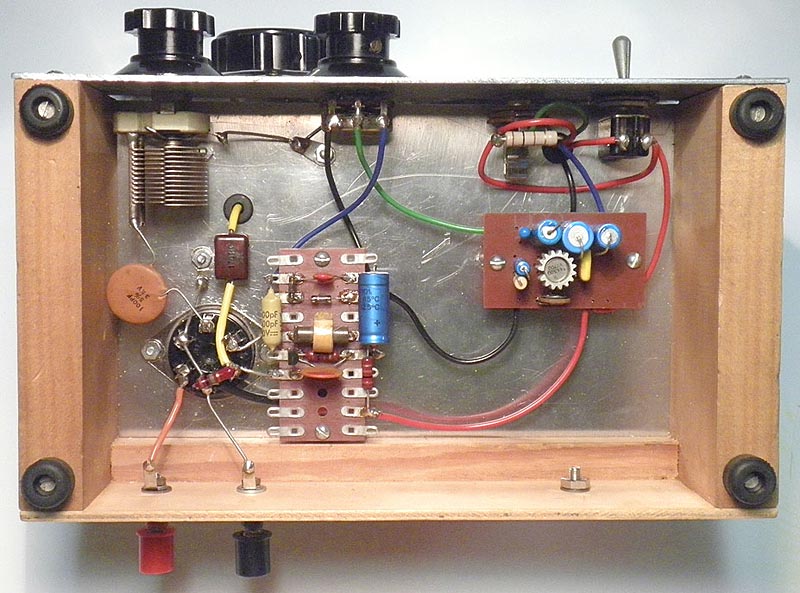 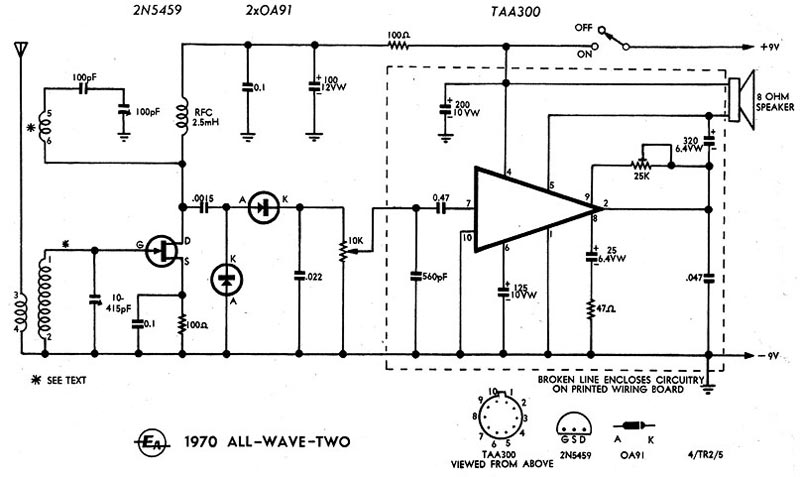 |
|
|
Return to top of page · Post #: 5 · Written at 4:10:51 PM on 17 July 2016.
|
|
|
|
Location: Daylesford, VIC
Member since 13 January 2011 Member #: 809 Postcount: 326 |
|
Roblan, the Sydney company that made the RMG series of tuning capacitors, is still around, but these days they produce mostly moulded plastic items and metal tools. JB (Johnson Brothers) UK may still be making parts for radio constructors, but I haven't been able to confirm this. Another question is, did Jabel merely import JB radio components, or did they make their own copies of JB items? The slow motion dials from both companies are very similar. |
|
|
Return to top of page · Post #: 6 · Written at 4:28:47 PM on 17 July 2016.
|
|

|
Location: Hill Top, NSW
Member since 18 September 2015 Member #: 1801 Postcount: 2245 |
|
Impressive. |
|
|
Return to top of page · Post #: 7 · Written at 4:43:33 PM on 17 July 2016.
|
|
|
|
Location: Sydney, NSW
Member since 28 January 2011 Member #: 823 Postcount: 6935 |
|
Now that I see the photos, I remember that one. I was considering building it myself back in the day. |
|
|
Return to top of page · Post #: 8 · Written at 11:53:15 AM on 18 July 2016.
|
|
|
|
Location: Daylesford, VIC
Member since 13 January 2011 Member #: 809 Postcount: 326 |
|
Selectivity I'd rate as good enough for listening to those shortwave broadcasts that are actually aimed at Australia, but it isn't very sensitive, so you need a long aerial and a proper earth. The bands are selected by plugging in one of the four coils. At the moment I've only finished the "B" coil which covers 6 - 15MHz. The 15 - 30MHz "A" coil was troublesome; I've had to halve the number of tuning turns and add a 22pF inside the former to get it to match the dial scale, and now I've got to rewind the reaction turns. Perhaps the blokes at E.A. slapped the dial from another set on to this without bothering to check if it matched? There's often something awry with their radio projects, but nowadays I look at them and think, "This would be fun to build, a bit of a challenge, what would I have to change to get it to work properly?" Like the 1970 EA160 Receiver, which had double conversion, but awful uncalibrated manual RF tuning that couldn't distinguish between the correct frequency and and an image! |
|
|
Return to top of page · Post #: 9 · Written at 11:57:32 AM on 18 July 2016.
|
|
|
|
Location: Hill Top, NSW
Member since 18 September 2015 Member #: 1801 Postcount: 2245 |
|
Yes, the projects presented in EA looked appealing, but it was always a good idea to wait a few months for the inevitable corrections in the back pages. Most of their projects suffered from mistakes of one kind or another. |
|
|
Return to top of page · Post #: 10 · Written at 11:15:19 AM on 7 August 2016.
|
|
|
|
Location: Toongabbie, NSW
Member since 19 November 2015 Member #: 1828 Postcount: 1400 |
|
Hi Sue, what a good piece of work! I never care much about what type of recreation I am looking at whether it be a car or a boat or radio or little or big. It is the amount of care put into it that counts. That set is so good looking with each part on top looking so important and with a job to do. |
|
|
Return to top of page · Post #: 11 · Written at 10:28:59 AM on 21 August 2016.
|
|
|
|
Location: Daylesford, VIC
Member since 13 January 2011 Member #: 809 Postcount: 326 |
|
Thanks for the comments, Fred. To tell you the truth, I used to line up screw slots when I put something back together, but decided in the end that it didn't look "natural"! I'd considered brushing the front panel, but thought it wouldn't look right unless the brushing was completely parallel. Is there a way to get that with hand brushing? |
|
|
« Back ·
1 ·
Next »
|
|
|
You need to be a member to post comments on this forum.
|
|
Sign In
Vintage Radio and Television is proudly brought to you by an era where things were built with pride and made to last.
DISCLAIMER: Valve radios and televisions contain voltages that can deliver lethal shocks. You should not attempt to work on a valve radio or other electrical appliances unless you know exactly what you are doing and have gained some experience with electronics and working around high voltages. The owner, administrators and staff of Vintage Radio & Television will accept no liability for any damage, injury or loss of life that comes as a result of your use or mis-use of information on this website. Please read our Safety Warning before using this website.
WARNING: Under no circumstances should you ever apply power to a vintage radio, television or other electrical appliance you have acquired without first having it checked and serviced by an experienced person. Also, at no time should any appliance be connected to an electricity supply if the power cord is damaged. If in doubt, do not apply power.
Shintara - Keepin' It Real · VileSilencer - Maintain The Rage