
General Discussion
Forum home - Go back to General discussion
|
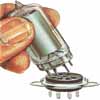
Astor HQ with Dual Piston variable Capacitor
|
|
|
Return to top of page · Post #: 1 · Written at 6:37:51 PM on 3 June 2018.
|
|
|
|
Location: Sydney, NSW
Member since 22 May 2017 Member #: 2114 Postcount: 120 |
|
I picked up recently an Astor HQ , just like the one that sat on our Kitchen table when I was kid, that my father use to listen to the horses racers on on the weekend. |
|
|
Return to top of page · Post #: 2 · Written at 7:33:12 PM on 3 June 2018.
|
|
|
|
Location: Linton, VIC
Member since 30 December 2016 Member #: 2028 Postcount: 472 |
|
Captgogo, |
|
|
Return to top of page · Post #: 3 · Written at 8:04:39 PM on 3 June 2018.
|
|

|
Location: Sydney, NSW
Member since 28 January 2011 Member #: 823 Postcount: 6911 |
|
a dual piston Variable Capacitor |
|
|
Return to top of page · Post #: 4 · Written at 9:32:37 PM on 3 June 2018.
|
|
|
|
Location: Linton, VIC
Member since 30 December 2016 Member #: 2028 Postcount: 472 |
|
GTC, |
|
|
Return to top of page · Post #: 5 · Written at 6:06:29 AM on 4 June 2018.
|
|

|
Administrator
Location: Naremburn, NSW
Member since 15 November 2005 Member #: 1 Postcount: 7590 |
|
Just from memory, it was three steps---tune in station---pull out push-button---push in push-button. ‾‾‾‾‾‾‾‾‾‾‾‾‾‾‾‾‾‾‾‾‾‾‾‾‾‾‾‾‾‾‾‾‾‾‾‾‾‾‾‾‾‾‾‾‾‾‾‾‾‾‾‾‾‾‾‾‾‾‾‾‾‾‾‾‾‾‾‾ A valve a day keeps the transistor away... |
|
|
Return to top of page · Post #: 6 · Written at 6:58:35 AM on 4 June 2018.
|
|
|
Location: Melbourne, VIC
Member since 20 September 2011 Member #: 1009 Postcount: 1261 |
|
The version with the permeability tuner is the Mickey HNQ. |
|
|
Return to top of page · Post #: 7 · Written at 8:03:29 AM on 4 June 2018.
|
|
|
|
Location: Sydney, NSW
Member since 22 May 2017 Member #: 2114 Postcount: 120 |
|
I thought I posted a response last night, but I might have imagined it. |
|
|
Return to top of page · Post #: 8 · Written at 9:24:17 AM on 4 June 2018.
|
|

|
Location: Wangaratta, VIC
Member since 21 February 2009 Member #: 438 Postcount: 5663 |
|
HNQ is permeability tuned 6BE6, 6AD8, 6AQ5, 6X5. Which means its likely a reflexed set & also at a glance is back biased. |
|
|
Return to top of page · Post #: 9 · Written at 10:34:09 AM on 4 June 2018.
|
|
|
|
Location: Sydney, NSW
Member since 28 January 2011 Member #: 823 Postcount: 6911 |
|
the controls in older cars were more tactile than the silly touch screens that are employed today |
|
|
Return to top of page · Post #: 10 · Written at 11:02:51 AM on 5 June 2018.
|
|

|
Location: Beechmont, QLD
Member since 10 April 2009 Member #: 465 Postcount: 109 |
|
I have often found the tuning coils to be open circuit on these. |
|
|
Return to top of page · Post #: 11 · Written at 7:36:40 AM on 6 June 2018.
|
|
|
|
Location: Sydney, NSW
Member since 22 May 2017 Member #: 2114 Postcount: 120 |
|
Thanks Marcc, as always appreciate your advise, insights and experience. |
|
|
Return to top of page · Post #: 12 · Written at 4:29:36 PM on 6 June 2018.
|
|
|
|
Location: Wangaratta, VIC
Member since 21 February 2009 Member #: 438 Postcount: 5663 |
|
The major culprit for interference is the switch mode unit, which the modern flouro has & some LED ones are no better. There might be a filter in some of those Flouro's? |
|
|
Return to top of page · Post #: 13 · Written at 9:15:40 PM on 6 June 2018.
|
|
|
|
Location: Clare, SA
Member since 27 March 2016 Member #: 1894 Postcount: 513 |
|
I have one of those. Horrid things. I've spent hours on mine and it won't work no matter what I do, it's currently in the junk too hard basket. |
|
|
Return to top of page · Post #: 14 · Written at 12:04:39 AM on 7 June 2018.
|
|
|
|
Location: Brunswick, VIC
Member since 3 May 2017 Member #: 2100 Postcount: 43 |
|
Hi, |
|
|
Return to top of page · Post #: 15 · Written at 7:53:22 AM on 7 June 2018.
|
|
|
|
Location: Sydney, NSW
Member since 22 May 2017 Member #: 2114 Postcount: 120 |
|
Hi Frank, |
|
|
You need to be a member to post comments on this forum.
|
|

Sign In
Vintage Radio and Television is proudly brought to you by an era where things were built with pride and made to last.
DISCLAIMER: Valve radios and televisions contain voltages that can deliver lethal shocks. You should not attempt to work on a valve radio or other electrical appliances unless you know exactly what you are doing and have gained some experience with electronics and working around high voltages. The owner, administrators and staff of Vintage Radio & Television will accept no liability for any damage, injury or loss of life that comes as a result of your use or mis-use of information on this website. Please read our Safety Warning before using this website.
WARNING: Under no circumstances should you ever apply power to a vintage radio, television or other electrical appliance you have acquired without first having it checked and serviced by an experienced person. Also, at no time should any appliance be connected to an electricity supply if the power cord is damaged. If in doubt, do not apply power.
Shintara - Keepin' It Real · VileSilencer - Maintain The Rage